
You can get started with Write-N-Cite easily and view the formatting of your in-text citations, footnotes and bibliography – all while you are writing your paper.
To get started
Step 1. Launch Write-N-Cite
Note: The first time you launch Write-N-Cite, you must be connected to the internet in order to log in to your RefWorks library and sync it with Write-N-Cite.
Tip: In most cases, there is no need to log out of Write-N-Cite when you are not using it. If you are using Write-N-Cite on a public computer without a personal login, you should log out of Write-N-Cite when you complete your work. If someone does gain access to a system with your RefWorks library logged in to Write-N-Cite, they will not be able to change anything in your account since Write-N-Cite doesn’t have any features to edit your items.
Logging In To Write-N-Cite:
1. Click RefWorks from the Microsoft Word ribbon.

2. Click Log In.

3. Click "Flow" and then enter your email address and Flow password and click "Login".

The first time you log in to Write-N-Cite, it will automatically “sync” with your RefWorks library. This may take a few seconds. It is downloading your references and collections. Any time you make changes to your RefWorks items you can click Sync my Database your new and edited items will be added to Write-N-Cite.
During this period, you can still access all of Word’s functionality, but the Write-N-Cite functions will not become active until syncing has finished.
Step 2. Selecting Your Output Style
The first thing you will want to do is select an output style for your document. Any in-text citations or footnotes and your bibliography will be displayed in your document while you write your paper – in the output style you have selected. You can always change the style later if you need to.
1. Click the Style drop down. You will see a list of RefWorks' recent styles.
2. Click on the style name.
3. You can change your output style and the formatting of your paper at any time by clicking on another Style in the list and selecting a new output style. Access to other Styles can be gained by using Select Other Style at the bottom of the list.

Step 3. Write Your Paper and Inserting Citations or Footnotes and Your Bibliography
Note: You may want to sync your RefWorks library with Write-N-Cite if you have recently added items you want to use in your paper. Click the Sync my database icon to download new or updated items.
When you are ready to insert an in-text citation or footnote into your paper:
1. Click the Insert Citation and Insert New option to launch the insert/edit citation box. If you have previously used Write-N-Cite, you may see some recently selected citations listed above the Insert New option. You can select citations displayed from this list or access all your references from the Insert New option.

2. Once the Insert/Edit Citation box displays, you can access your items by Collection or by searching. The Search box will search every field.

Tip: Use the horizontal scroll bar to see the full title. Right-click on the item and select Show Full Reference Detail to display all fields of information (file attachments are not displayed).

Full Reference View:

3. Click on the item you wish to insert into your paper. You will see a preview of the formatted citation in your current Output Style.
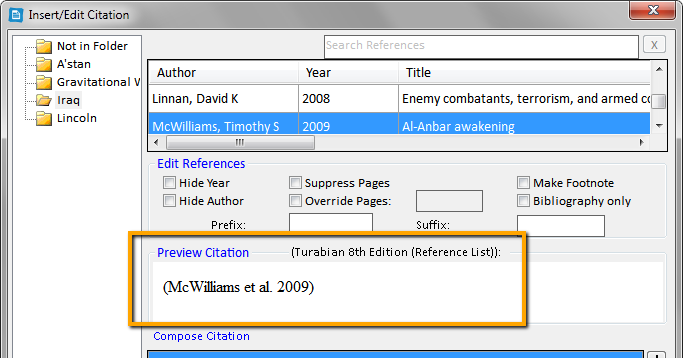
Tip: Add more references to the citation using the plus icon, remove them by using the minus icon, or reorder the references with the up and down arrows in the Compose Citation area.

4. Click OK to insert your formatted citation into your paper.
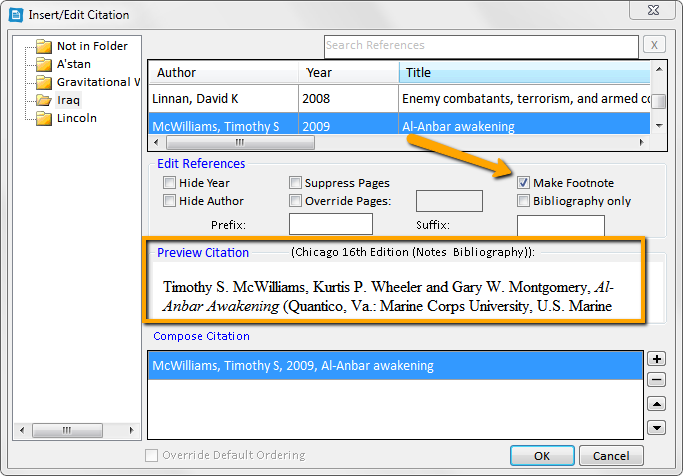
5. To insert a footnote instead of an in-text citation, click the Make Footnote checkbox in the Edit References area. Once you make a footnote and finish editing the citation, you will not be able to undo this action. However, you can always add a new in-text citation.
6. You can insert your bibliography anywhere in your paper while you are writing. Click Bibliography Options, Insert Bibliography. Note: the bibliography will be inserted wherever the cursor is in your paper.


You can click Remove Bibliography and re-insert if it you need to change the location.

Step 4. Save your formatted paper (you should really save it periodically while you are writing!).